How to enable Vale linting in VSCode
You must complete the following prerequisites before you begin to install Vale:
| Task | Reason |
|---|---|
| Trust your workspace in VSCode. | This helps extensions work as desired in your workspace. |
| Show file extensions in Windows Explorer. | It helps avoid confusion when copy-pasting file name or when dragging a file on a command window to get its path. |
| Update VSCode to the latest version. | Because it's there! |
Execute npm install -g mdx2vast | Enables Vale checks for .mdx files. |
Configure to use the Vale extension in VSCode
-
Clone the GitHub repository https://github.com/ashishguptaiitb/koreaidocs-vale-rules locally. Let's assume that your local path is
C:/Users/X/Documents/GitHub/koreaidocs-vale-rules. -
Open the
.vale.inifile in the above directory and change the value of theStylesPathvariable to the path of the current folder. In our example, the value of theStylesPathvariable becomesC:/Users/X/Documents/GitHub/koreaidocs-vale-rules. Save and close the.vale.inifile.![Style path variable value in the Vale INI file.]/assets/vale-ini-stylepath.png)
-
Open VSCode that's updated to the latest version. Select File > Preferences > Settings.
-
Install the Vale extension in VSCode. Restart VSCode editor.
-
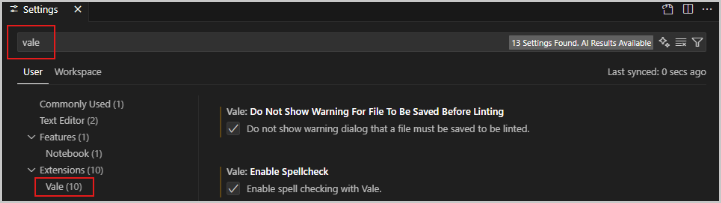
Search for Vale in the search settings field. In the search results, select Vale from the left sidebar.
-
Select the Vale: Do Not Show Warning For File To Be Saved Before Linting option.
-
Select the Vale: Enable Spellcheck option.
-
Change the value of the Vale: Max Number Of Problems option to 500.
-
In the Vale > Vale CLI: Config field, enter the path of the .ini settings file. In our example, the file path is
C:/Users/X/Documents/GitHub/koreaidocs-vale-rules/.vale.ini. -
To enable Vale checks for .mdx files, run the command
npm install -g mdx2vaston a command prompt. -
Relaunch VSCode to load the new settings.
Use the extension in VSCode
-
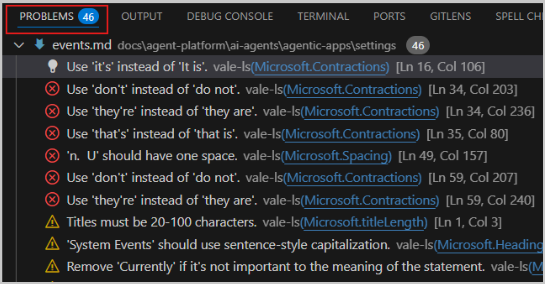
Open any help article and select View > Problems to view the style issues. Report generation may take some time. Update the content to resolve these issues.
-
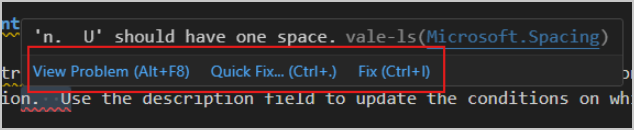
Select each issue and update the content to resolve it. Hover the pointer over the issue to view the option to fix the problem.
-
Optionally, if you choose Quick Fix, it provides an AI-generated explanation of the problem, fixes the problem, and then prompts you to accept the updates. Choose Accept if you approve of the fix.

Troubleshoot Vale usage and config
-
If you see
E100error in VSCode, in the lower-right corner, it indicates that VSCode Vale extension isn't able to find the vocab files. To resolve, make sure in VSCode settings, the path to the config file that you provide is,- Path of the
.vale.inifile and not of the cloned folder. - Not wrapped in double quotes and doesn't contain spaces.
- Path of the
-
If you see fatal error when cloning the repo in GitHub desktop client, it indicates either a permissions issue or an incorrect path.
- Make sure that you are cloning the repo in a folder where you have read-write permissions. For example, don't clone directly into
C:\but use a folder insideC:/Users/X/, for example, theDocumentsfolder or theDesktopfolder. - Make sure that you haven't cloned the repo in a mapped drive. For example, OneDrive or Google Drive.
- Make sure that you haven't added any special characters in the URL or the local folder. Also, make sure that you don't copy an extra space in the URL of the GitHub repo.
- Make sure that you are cloning the repo in a folder where you have read-write permissions. For example, don't clone directly into